
Dal Tadka is the crown jewel of Indian vegetarian cuisine. If you walk into any Indian restaurant, from the most upscale dining establishments to the humble roadside “Dhabas,” Dal Tadka is almost certainly on the menu. It is a dish that represents the heart of Indian comfort food, offering a soul-satisfying blend of creamy lentils, aromatic spices, and the characteristic smoky punch that comes from the “Tadka” or tempering. While many people cook dal at home daily, there is often a distinct difference between a home-cooked bowl and the vibrant, flavor-packed version served in restaurants. This guide is designed to bridge that gap, providing you with a comprehensive walkthrough and five professional secrets to achieving that authentic restaurant-style flavor in your own kitchen.
The beauty of Dal Tadka lies in its simplicity. At its core, it is a preparation of yellow lentils cooked until soft and then seasoned with a mixture of spices fried in hot oil or ghee. However, the complexity of its flavor comes from the layers of seasoning. It is not just about boiling lentils; it is about the timing of the spices, the quality of the fat used, and the specific techniques used to infuse aroma into the dish. In this article, we will explore the history, the nutritional benefits, and the meticulous process of creating a Dal Tadka that will rival any professional chef’s version.
Recipe Information
- Prep Time: 15 Minutes
- Cook Time: 35 Minutes
- Total Time: 50 Minutes
- Cuisine: Indian
- Category: Main Course
- Servings: 4 People
- Difficulty: Intermediate
Ingredients
To create the perfect Dal Tadka, you need high-quality ingredients. Each component plays a vital role in building the final flavor profile. We will categorize these into the lentil base, the primary masala base, and the final tempering elements.
The Lentil Base:
- 1 cup Toor Dal (Arhar Dal/Split Pigeon Peas): This provides the body and the traditional nutty flavor.
- 1/4 cup Dhuli Moong Dal (Split Yellow Mung Beans): This is a secret addition that adds a creamy, velvety texture to the dal.
- 3.5 cups Water: For pressure cooking or boiling.
- 1/2 teaspoon Turmeric Powder: For that vibrant golden hue and antiseptic properties.
- 1 teaspoon Salt: Adjusted to taste.
- 1 teaspoon Ginger-Garlic Paste: To infuse the lentils with flavor from the start.
- 1/2 teaspoon Oil: To prevent the dal from frothing and spilling out of the pressure cooker.
The Primary Masala (First Tadka):
- 2 tablespoons Ghee or Oil: Ghee is highly recommended for an authentic taste.
- 1 medium Onion: Finely chopped.
- 2 medium Tomatoes: Finely chopped.
- 1-2 Green Chilies: Slit lengthwise or finely chopped for heat.
- 1 teaspoon Cumin Seeds (Jeera): For an earthy aroma.
- 1/4 teaspoon Asafoetida (Hing): A crucial digestive aid and flavor enhancer.
- 1 tablespoon Ginger-Garlic Paste: Freshly pounded is best.
- 1/2 teaspoon Red Chili Powder: Preferably Kashmiri red chili for color without excessive heat.
- 1/2 teaspoon Coriander Powder: For a subtle citrusy undertone.
- 1/4 teaspoon Garam Masala: To be added towards the end.
- 1 tablespoon Kasuri Methi (Dried Fenugreek Leaves): Crushed between palms.
- Fresh Coriander Leaves: A generous handful, chopped.
The Final Garnish (Second Tadka):
- 1 tablespoon Ghee: The fat of choice for the final aroma.
- 1/2 teaspoon Cumin Seeds: For fresh crunch.
- 2-3 Dried Red Chilies: For a smoky look and mild heat.
- 3-4 cloves Garlic: Thinly sliced. This is what creates “Lasooni” (garlicky) Dal Tadka.
- 1/2 teaspoon Kashmiri Red Chili Powder: To give the dal that signature red oil swirl on top.
Preparation
The preparation of Dal Tadka involves a multi-step process. While it may seem like many steps, each one is designed to build layers of flavor. Follow these instructions carefully to ensure the best results.
Step 1: Washing and Soaking the Lentils
Start by mixing the Toor dal and Moong dal in a large bowl. Wash them under running water at least three to four times until the water runs clear. This removes excess starch and any impurities. Once washed, soak the lentils in enough water for at least 20 to 30 minutes. Soaking is vital as it ensures even cooking and helps in better digestion of the pulses.
Step 2: Cooking the Lentils
Transfer the soaked and drained lentils into a pressure cooker. Add 3.5 cups of water, turmeric powder, salt, ginger-garlic paste, and a drop of oil. Close the lid and cook on medium heat. If using a standard pressure cooker, cook for 3 to 4 whistles. If using an Instant Pot, 8 minutes on high pressure with natural release works perfectly. The goal is for the lentils to be completely soft and mashable, but not turned into a completely homogeneous paste; a little texture is desirable.
Step 3: Mashing the Dal
Once the pressure has released naturally, open the lid. Use a wire whisk or a wooden churner (mathani) to gently whisk the dal. Do not over-process; you want a creamy consistency where some dal grains are still visible. If the dal looks too thick, you can add half a cup of hot water to adjust the consistency. Never add cold water to cooked dal as it can separate the water from the lentils and ruin the texture.
Step 4: Preparing the Masala Base (The First Tadka)
In a heavy-bottomed pan or kadai, heat 2 tablespoons of ghee. Once the ghee is hot, add the cumin seeds and let them crackle. Add the asafoetida (hing) and immediately add the chopped onions. Sauté the onions on medium heat until they turn translucent and start to pick up a light golden-brown color. Add the ginger-garlic paste and green chilies. Sauté for another minute until the raw smell of the garlic disappears.
Step 5: Adding Tomatoes and Spices
Add the chopped tomatoes and a pinch of salt (remembering we already salted the dal). Cook until the tomatoes turn soft and mushy, and the oil starts to separate from the sides of the masala. Now, turn the heat to low and add the red chili powder and coriander powder. Sauté for 30 seconds, being careful not to burn the dry spices. Add a splash of water if the spices look like they are sticking to the pan.
Step 6: Simmering the Dal
Pour the cooked and whisked dal into the pan with the masala. Stir well to combine everything. Let the dal come to a gentle simmer. Add the garam masala and the crushed kasuri methi. Let the dal simmer on low heat for 5 to 7 minutes. This allows the lentils to absorb the flavors of the sautéed aromatics. Finally, stir in the freshly chopped coriander leaves.
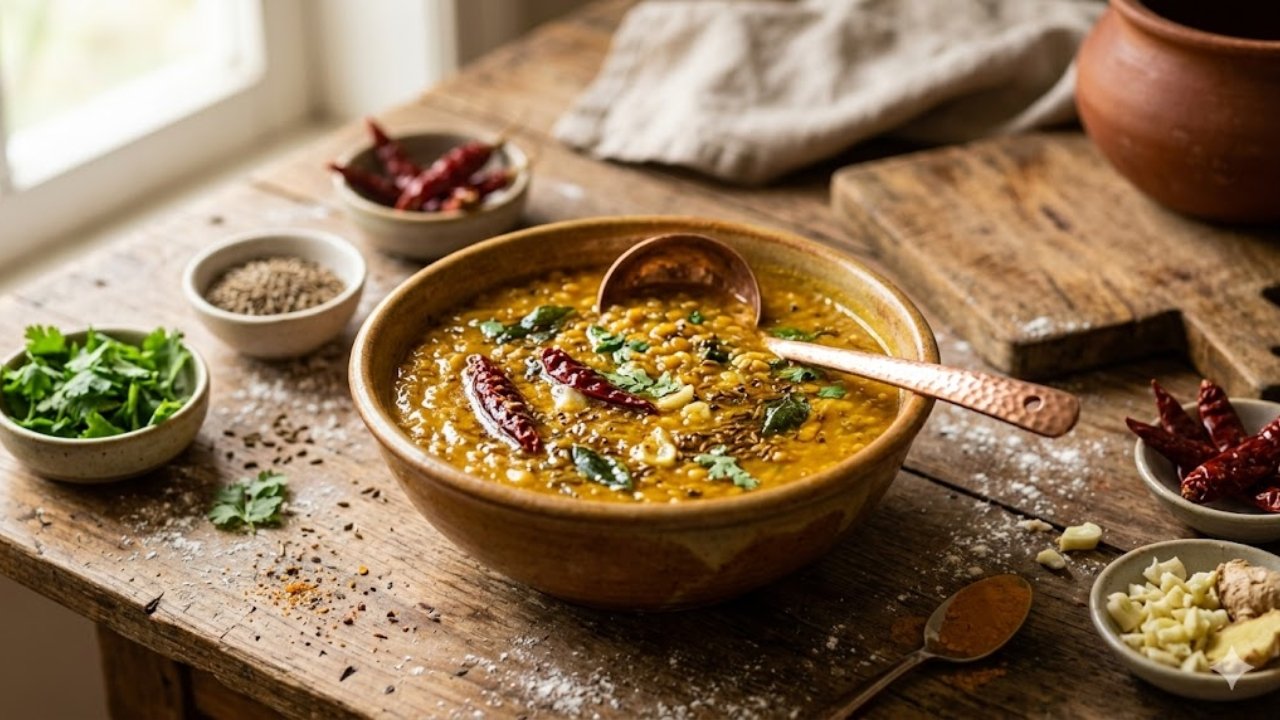
Step 7: The Final Restaurant Touch (The Second Tadka)
This is the most important step for the restaurant look and taste. In a small tempering pan (tadka pan), heat 1 tablespoon of ghee. Add cumin seeds and let them sizzle. Add the sliced garlic and fry until the garlic turns a deep golden brown—be careful not to burn it. Add the dried red chilies. Turn off the heat and add the Kashmiri red chili powder. Immediately pour this sizzling hot tempering over the simmering dal. Cover the pan with a lid for 2 minutes to trap the aromas. Serve hot.
Tips
To truly master the art of restaurant-style Dal Tadka, you must understand the subtle nuances that professional chefs use. Here are 5 simple tricks that will elevate your dish from ordinary to extraordinary.
Trick 1: The Dual-Lentil Strategy
While many homes use only Toor dal, restaurants often mix a small amount of Moong dal or even Masoor dal (red lentils) into the mix. The Toor dal provides the classic flavor, but Moong dal breaks down much faster, creating a natural thickening agent that gives the dal a silky, creamy mouthfeel without needing to overcook the primary lentils.
Trick 2: The Double Tadka Technique
The “Tadka” in Dal Tadka literally means tempering. In restaurants, they rarely do just one tempering. The first tempering (with onions and tomatoes) builds the flavor base. The second tempering, performed just before serving, provides the fresh aromatic hit of burnt garlic and ghee that hits your senses the moment the dish is placed on the table.
Trick 3: The “Dhungar” (Charcoal Smoking) Method
If you want that authentic smoky flavor found in Dhaba-style dal, use the Dhungar method. Heat a small piece of natural charcoal until it is red hot. Place a small metal bowl or a piece of aluminum foil on top of the cooked dal. Place the hot charcoal in the bowl, pour a teaspoon of ghee over the charcoal, and when it starts to smoke, immediately cover the pot with a tight-fitting lid. Let it sit for 3 to 5 minutes. The dal will absorb the smoky essence perfectly.
Trick 4: Tempering Temperature Control
A common mistake is adding red chili powder to the tempering while the flame is still on. This often burns the spice, turning it bitter and dark. Always turn off the flame before adding the red chili powder to the hot ghee. The residual heat is enough to cook the spice and release its color without scorching it.
Trick 5: The Power of Kasuri Methi and Ghee
Never substitute oil for ghee in the final tempering if you want a restaurant flavor. Ghee has a high smoke point and a rich, buttery aroma that oil simply cannot replicate. Additionally, the inclusion of Kasuri Methi (dried fenugreek) provides a subtle bitterness and floral aroma that is a hallmark of professional North Indian cooking.
Variations
Dal Tadka is a versatile template that can be modified to suit different tastes and regional preferences. Here are a few popular variations you might want to try once you have mastered the basic recipe.
1. Lasooni Dal Tadka: This variation emphasizes the garlic flavor. Increase the amount of garlic in the second tempering and fry it until it is quite dark (but not black). This gives a bold, pungent, and smoky garlic flavor that is incredibly popular in many Indian cities.
2. Palak Dal Tadka: To make the dish healthier and more colorful, you can add finely chopped fresh spinach (palak) to the dal while it is simmering with the masala base. The spinach wilts quickly and adds a lovely earthy flavor and a boost of iron and vitamins.
3. Dhaba Style Mixed Dal: Some dhabas use a “Panchmel” or five-lentil mix. This includes Toor, Moong, Masoor, Chana (split chickpeas), and Urad dal. This version is much thicker and heartier, often served with large pieces of ginger and extra green chilies.
4. Jeera Dal: For a lighter version, you can skip the onions and tomatoes entirely. Simply cook the dal with turmeric and salt, and perform a heavy tempering with ghee, a large amount of cumin seeds (jeera), and green chilies. This is an excellent light meal often served during summers.
Conclusion
Mastering the perfect Dal Tadka is a journey into the heart of Indian aromatics. By following the two-step tempering process and incorporating the smoky “Dhungar” technique, you can transform simple pantry staples into a gourmet experience. This dish is best enjoyed hot, paired with fragrant Basmati rice or freshly made Jeera rice. If you prefer bread, it goes wonderfully with tandoori roti, garlic naan, or even simple homemade phulkas. The combination of high-protein lentils and digestive spices makes this not only a delicious meal but also a nutritionally balanced one. We hope these five simple tricks help you achieve that elusive restaurant-style flavor right in your home kitchen. Happy cooking!
